HTTPS Introduction
HTTPS is HTTP communication between a web browser and a server over a secure, encrypted connection, using TLS (Transport Layer Security). The primary purpose for using HTTPS is to enable users to verify that a website that transfers sensitive data, can do so in a secure and safe manner. HTTPS uses SSL/TLS certificates on the server to encrypt the communication between the client and server so that packets in transmission cannot be intercepted and used to either steal or forge information. The concept of capturing packets in the middle of transmission between client and server or vice versa, is called a man in the middle attack.
Digital Certificates
HTTPS uses a protocol known as "TLS" (formerly "SSL" or "Secure Sockets Layer") to enable secure communication across a network in order to prevent tampering / eavesdropping. This is achieved through the use of something called a "digital certificate":
Digital Certificates have a key pair: a public and a private key. These keys work together to establish an encrypted connection. The certificate also contains what is called the “subject,” which is the identity of the certificate/website owner.
The most important part of a certificate is that it is digitally signed by a trusted CA ("Certificate Authority"), like DigiCert. Anyone can create a certificate, but browsers only trust certificates that come from an organization on their list of trusted CAs. Browsers come with a pre-installed list of trusted CAs, known as the Trusted Root CA store. In order to be added to the Trusted Root CA store and thus become a Certificate Authority, a company must comply with and be audited against security and authentication standards established by the browsers.
Essentially, for a website / app to use HTTPS, a certificate from a trusted source (such as "Digicert") is required. This certificate contains a "digital signature", signed by the Certificate Authority (ie: "Digicert") which proves the validity of the certificate and the website. It also contains a public / private key pair, enabling messages to be encrypted using a public key, but only read using the corresponding private key. Encrypting messages using a trusted website's public key is the first step to enabling two way encrypted communication:
When a web browser (or client) directs to a secured website, the website server shares its TLS/SSL certificate and its public key with the client to establish a secure connection and a unique session key.
The browser confirms that it recognizes and trusts the issuer, or Certificate Authority, of the SSL certificate—in this case DigiCert. The browser also checks to ensure the TLS/SSL certificate is unexpired, unrevoked, and that it can be trusted.
The browser sends back a symmetric session key and the server decrypts the symmetric session key using its private key. The server then sends back an acknowledgement encrypted with the session key to start the encrypted session.
Server and browser now encrypt all transmitted data with the session key. They begin a secure session that protects message privacy, message integrity, and server security.
Viewing Certificates
Information about a website's digital certificate can be easily viewed in a modern web browser. Typically, to the left of the URL bar, you will find a "lock" icon. Click on it to view information about your connection with this website (screenshot taken in Chrome).
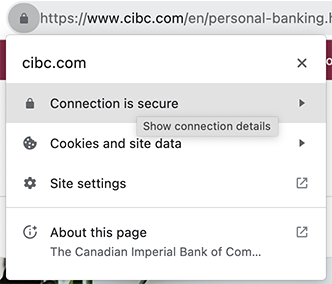
Notice how it shows that the site is using a secure connection with an option to "Show Connection Details". Clicking this allows us to confirm that the certificate is indeed valid and was issued by "DigiCert Inc".
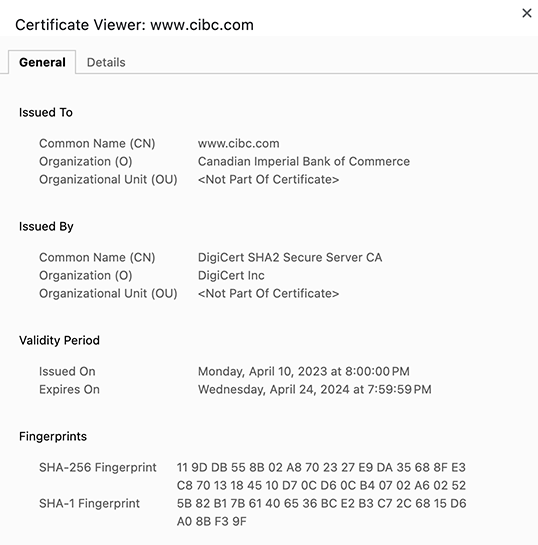
We may also switch to the "Details" pane, which provides information about the certificate, such as the issuer, expiration date, and the encryption algorithms used.
With this information, we can confirm that sending login credentials and retrieving banking information from CIBC is achieved using encrypted packets between the web browser and server. Anyone who might capture them in transit would not be able to obtain any useful information.
Self Signed Certificates
SSL/TLS certificates can be created on your own and technically they can be used, however it is important to note that these certificates should not be used in a production environment. This is because using your own "self signed" certificates will result in a warning from the browser that your website is using an "untrusted" certificate, since it did not come from a trusted CA.
Creating Self Signed Certificates (Development)
When testing HTTPS locally and during development, it is common to use a self signed certificate. We can generate them in the terminal using the following command:
openssl req -new -x509 -nodes -out server.crt -keyout server.key
This will initiate the following prompts for information about the organization the certificate will be issued to. The only important one for now is the Common Name - this must be localhost (ie: the domain the certificate will be valid for), since we will be running our server locally:
Generating a 2048 bit RSA private key
.............................+++
...+++
writing new private key to 'server.key'
-----
You are about to be asked to enter information that will be incorporated
into your certificate request.
What you are about to enter is what is called a Distinguished Name or a DN.
There are quite a few fields but you can leave some blank
For some fields there will be a default value,
If you enter '.', the field will be left blank.
-----
Country Name (2 letter code) []:CA
State or Province Name (full name) []:ON
Locality Name (eg, city) []:Toronto
Organization Name (eg, company) []:ACME Widgets
Organizational Unit Name (eg, section) []:IT Dept
Common Name (e.g. server FQDN or YOUR name) []:localhost
Email Address []:
This should generate two files: "server.crt" and "server.key:
Using SSL Certificates
Now that we have the required files (ie: "server.crt" and "server.key"), we can begin to configure our "server.js" code to start listening for both HTTP and HTTPS connections:
const fs = require('fs');
const http = require('http');
const https = require('https');
const express = require('express');
const app = express();

const HTTP_PORT = process.env.PORT || 8080;
const HTTPS_PORT = 4433;

app.get('/', (req, res) => {
  res.send('Hello World');
});

// read in the contents of the HTTPS certificate and key

const https_options = {
  key: fs.readFileSync(__dirname + '/server.key'),
  cert: fs.readFileSync(__dirname + '/server.crt'),
};

// listen on ports HTTP_PORT and HTTPS_PORT.

http.createServer(app).listen(HTTP_PORT, () => {
  console.log(`http server listening on: ${HTTP_PORT}`);
});
https.createServer(https_options, app).listen(HTTPS_PORT, () => {
  console.log(`https server listening on: ${HTTPS_PORT}`);
});
You will notice that a few key changes have been made to our usual "simple web server". Primarily:
We import both the "http" and "https" modules, as well as the "fs" module (to read the .crt and .key files)
Use createServer() method for both "http" and "https", making sure to provide the values for both the key and cert for the "https_options" parameter when using "https"
Finally, start the server and navigate to: https://localhost:4433
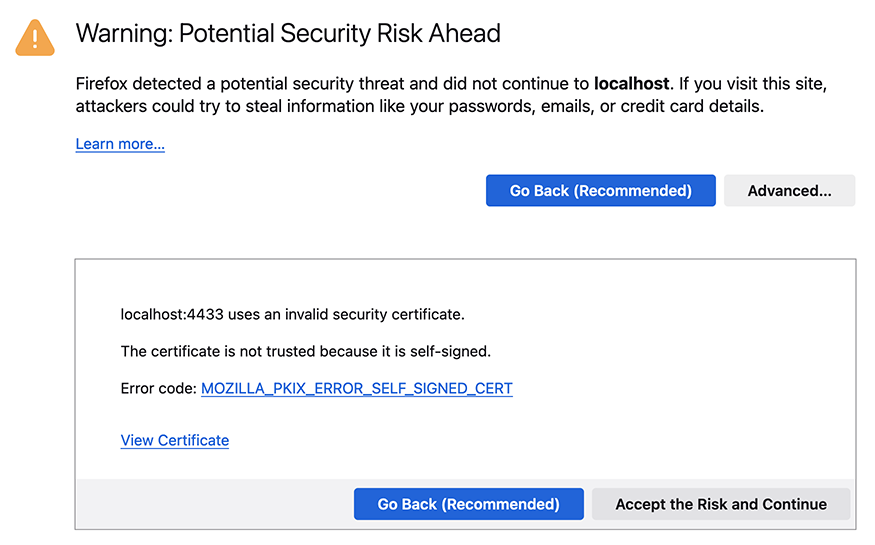
Depending on your web browser, you may observe a security warning if the system is functioning correctly. If you get this warning (with "Advanced" selected) everything is working as intended so far.
Warning in Firefox
Warning in Chrome
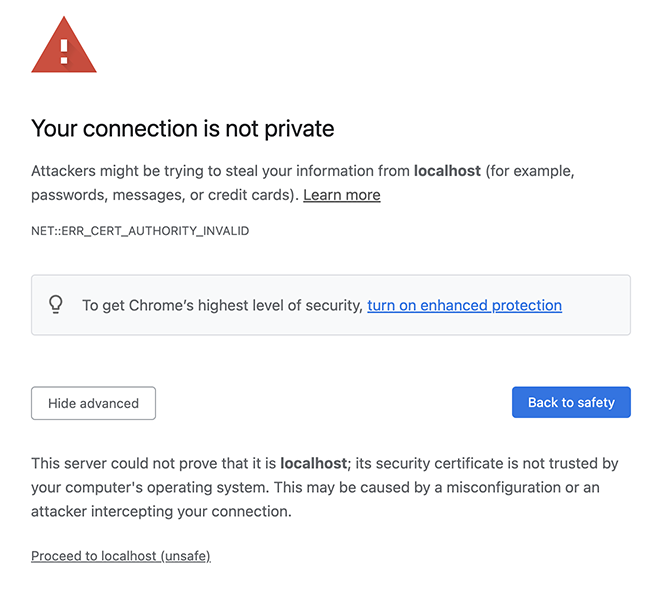
NOTE: If you do not see the option to "Proceed to localhost", then typing "thisisunsafe" will allow you to proceed.
Accept the warnings to add an exemption and proceed to the page.