Sequelize ORM with Postgres
Sequelize is an "ORM" tool, which stands for "Object-Relational Mapper". Using an Object-Relational Mapper enables us to interact with a relational database using object-oriented programming techniques, which abstracts away the need to write specific SQL statements. Instead, we work with regular JavaScript to interact with the data using familiar object-oriented & asynchronous programming techniques.
Using an ORM has two benefits:
You can replace the underlying database without necessarily needing to change the code that uses it. This allows developers to optimize for the characteristics of different databases based on their usage.
Basic validation of data can be implemented within the framework. This makes it easier and safer to check that data is stored in the correct type of database field, has the correct format (e.g. an email address), and isn't malicious in any way (hackers can use certain patterns of code to do bad things such as deleting database records).
Getting Started
Fortunately, "Sequelize" is packaged as a module on NPM (see: "sequelize"). Therefore to get started, we will need to "install" it as a dependency within our project. With your application folder open in Visual Studio Code, open the integrated terminal and enter the command
npm install sequelize pg pg-hstore
This will add both the sequelize and the pg / pg-hstore modules to our node_modules folder, as well as add their names & version numbers to our package.json file under "dependencies".
Next, we need to update our server.js file to use the new modules so that we can test our connection to the database. If you're working with an existing application, comment out any existing Express app code (routes, listen, etc.) that you have in server.js (for the time being) and add the following code:
const Sequelize = require('sequelize');

// set up sequelize to point to our postgres database
const sequelize = new Sequelize('database', 'user', 'password', {
  host: 'host',
  dialect: 'postgres',
  port: 5432,
  dialectOptions: {
    ssl: { rejectUnauthorized: false },
  },
});

sequelize
  .authenticate()
  .then(() => {
    console.log('Connection has been established successfully.');
  })
  .catch((err) => {
    console.log('Unable to connect to the database:', err);
  });
Where database is your "PGDATABASE" value, user is your "PGUSER" value, password is your "PGPASSWORD" and lastly, host will be your "PGHOST" url (ie: "ab-cd-12345.us-east-2.aws.neon.tech").
Once you have updated your app to use the Sequelize module, try running it using our usual "node server.js" command. If everything was entered correctly, you should see the following message in the console:
Executing (default): SELECT 1+1 AS result
Connection has been established successfully.
Finally, If you see any other errors at this point, go back and check that you have entered all of your credentials correctly when creating the sequelize object. Recall: You can use ctrl + c to stop a node.js application from running.
Models (Tables) Introduction
Now that we have successfully tested the connection to our Postgres database from our node.js application, we must discuss what the Sequelize module does and how we will be using it to manage data persistence within our Postgres Database.
As we know, sequelize is technically an Object-Relational Mapping ("ORM") framework. It maps our JavaScript objects ("models") to tables and rows within our database and will automatically execute relevant SQL commands on the database whenever data using our "models" (JavaScript objects) is updated. This saves us the trouble of manually writing complex SQL statements whenever we wish to update the back-end database to reflect changes made by the user.
To see this in action, update your server.js file to use the following code:
const Sequelize = require('sequelize');

// set up sequelize to point to our postgres database
const sequelize = new Sequelize('database', 'user', 'password', {
  host: 'host',
  dialect: 'postgres',
  port: 5432,
  dialectOptions: {
    ssl: { rejectUnauthorized: false },
  },
});

// Define a "Project" model

const Project = sequelize.define('Project', {
  title: Sequelize.STRING,
  description: Sequelize.TEXT,
});

// synchronize the Database with our models and automatically add the
// table if it does not exist

sequelize.sync().then(() => {
  // create a new "Project" and add it to the database
  Project.create({
    title: 'Project1',
    description: 'First Project',
  })
    .then((project) => {
      // you can now access the newly created Project via the variable project
      console.log('success!');
    })
    .catch((error) => {
      console.log('something went wrong!');
    });
});
Once again, database is your randomly generated “User & Default database” value, user is also your randomly generated “User & Default database” value, password is your password and lastly, host will be your server host url.
There is a lot going on in the above code - but before we walk through what everything is doing, try updating the above code with your database credentials and run it once again with node server.js. You should see the something very similar to the following output:
Executing (default): INSERT INTO "Projects" ("id","title","description","createdAt","updatedAt") VALUES (DEFAULT,'Project1','First Project','2017-02-28 22:45:25.163 +00:00','2017-02-28 22:45:25.163 +00:00') RETURNING \*;
success!
It appears that Sequelize has done some of the heavy lifting for us. To confirm that the create operation was successful and that we have indeed persisted "Project1" in a new "Projects" table, go back to your pgAdmin application, right-click on "Tables" and choose "Refresh". You should now see our new "Projects" table in the list.
To view the contents of the table, right-click on the "Projects" table and select View / Edit Data > All Rows. This will open a new window with a grid view that you can use to explore the data in the table:
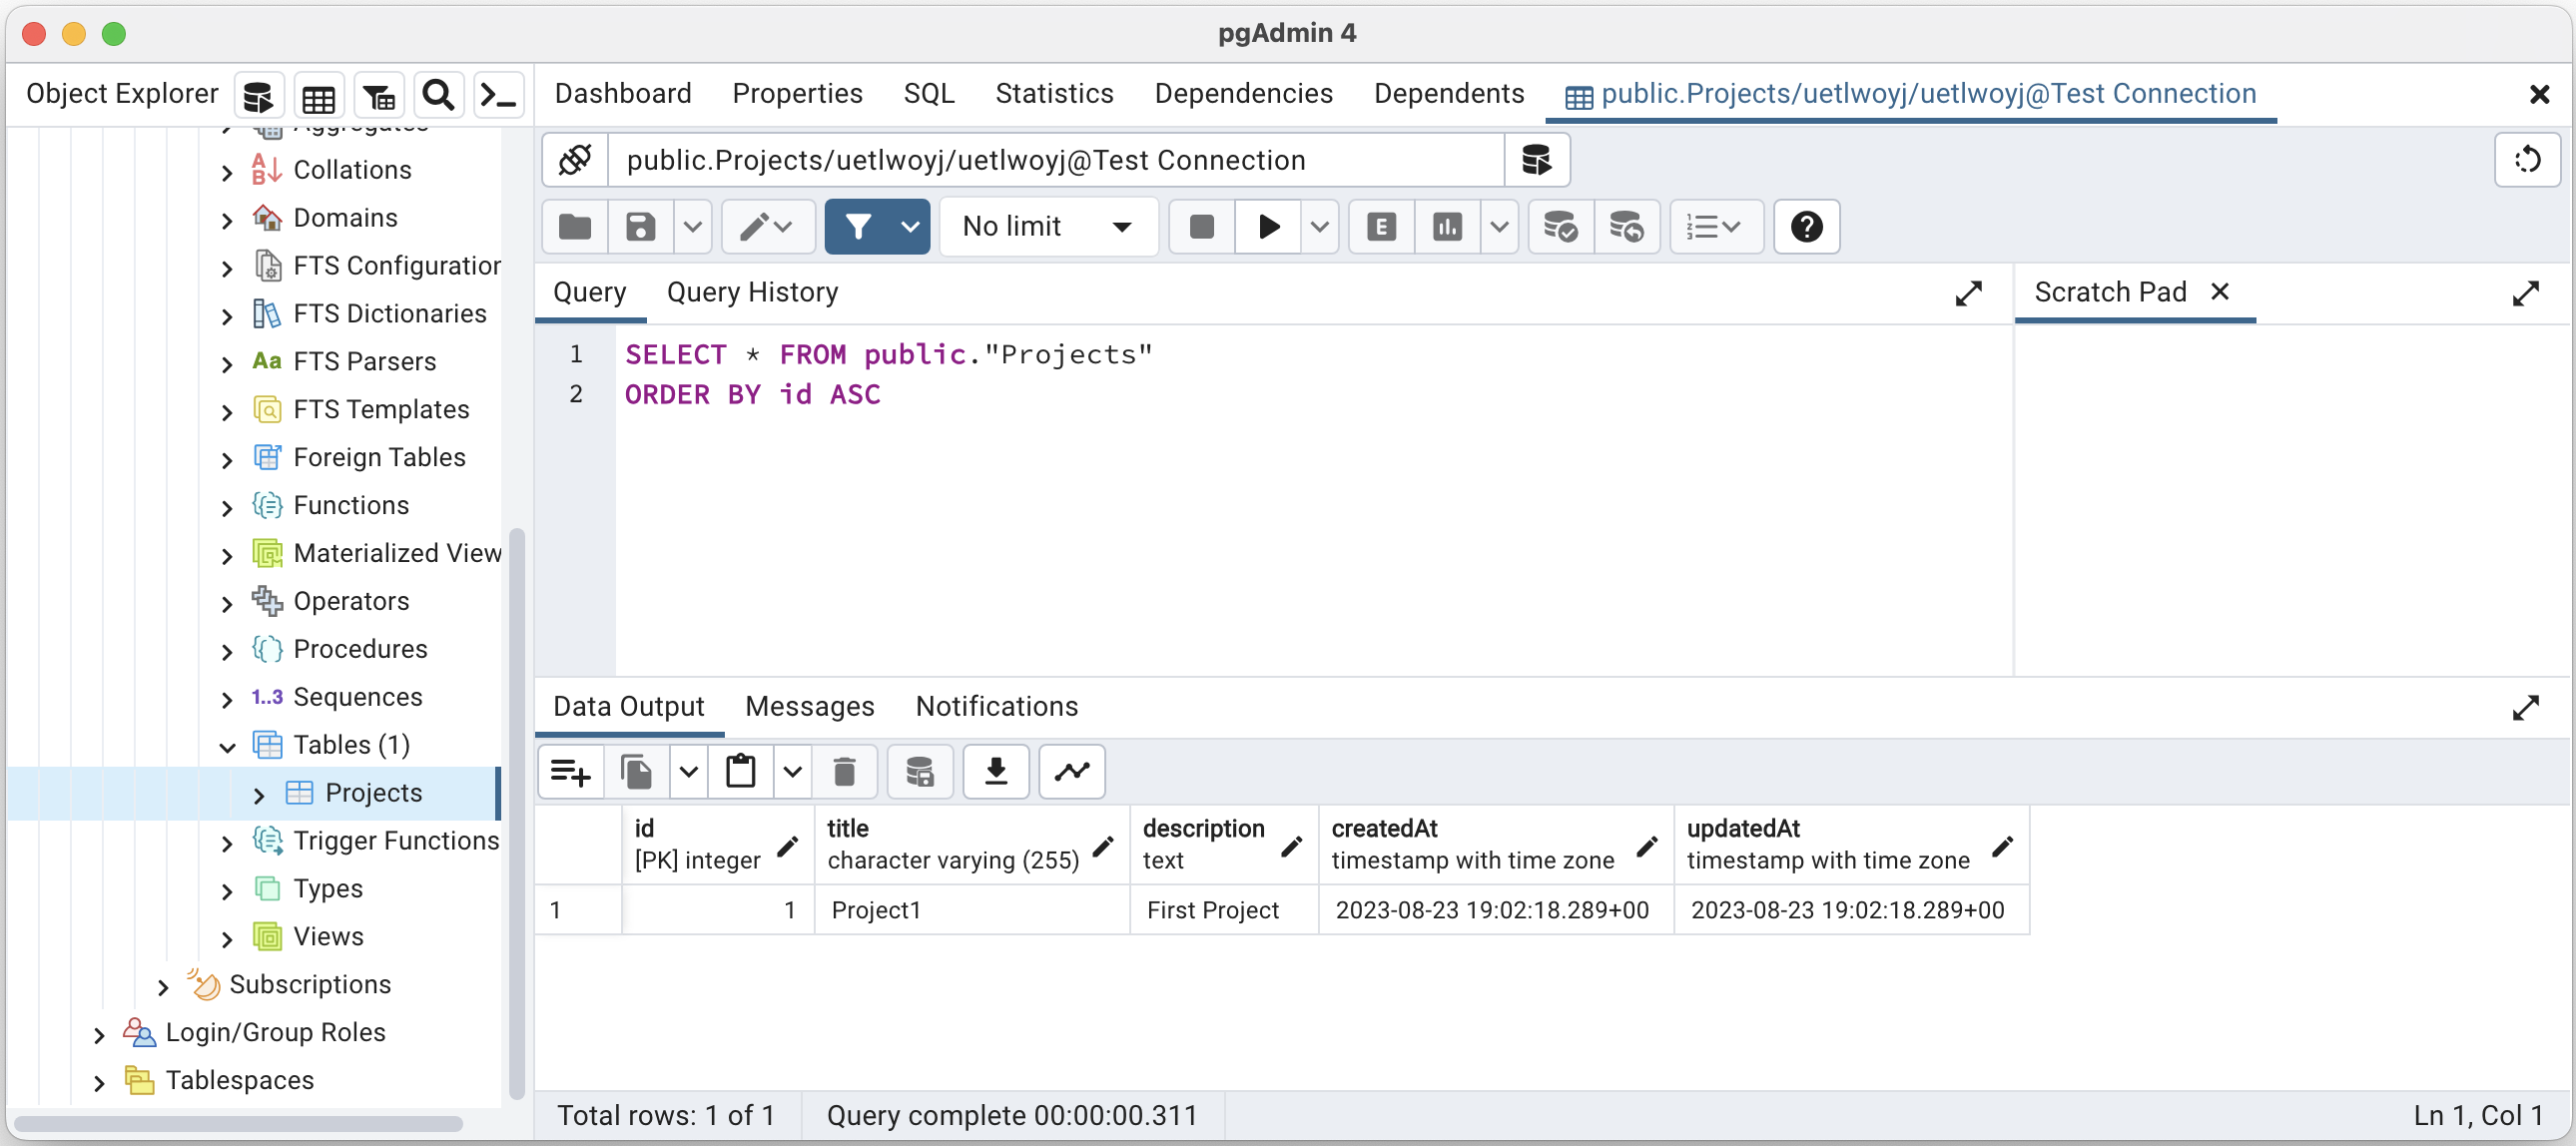
You will notice that there are some columns in the "Project" table that we didn't define in our "Project" Model; specifically: id, createdAt and updatedAt; recall:
// Define a "Project" model

const Project = sequelize.define('Project', {
  title: Sequelize.STRING,
  description: Sequelize.TEXT,
});
It follows that the title and description columns are there, but where did the others come from? The addition of the extra columns are actually added by default by the sequelize module. Whenever we "define" a new model, we automatically get id, createdAt and updatedAt and when we save data using this model, our data is automatically updated to include correct values for those fields. This is extremely handy, as we didn't actually create our primary-key for the table (sequelize went ahead and made "id" our primary key). Also, the createdAt and updatedAt fields are both widely used. However, if we decide that we want to specify our own auto-incrementing primary key and remove the createdAt and updatedAt fields, we can define our model using the following code instead:
// Define a "Project" model

const Project = sequelize.define(
  'Project',
  {
    project_id: {
      type: Sequelize.INTEGER,
      primaryKey: true, // use "project_id" as a primary key
      autoIncrement: true, // automatically increment the value
    },
    title: Sequelize.STRING,
    description: Sequelize.TEXT,
  },
  {
    createdAt: false, // disable createdAt
    updatedAt: false, // disable updatedAt
  }
);
Now that we have defined our Project model (either with or without the "createdAt" and "updatedAt" timestamps) we can look at the rest of the code, ie the sync() operation and creating Project1 - recall:
// synchronize the Database with our models and automatically add the
// table if it does not exist

sequelize.sync().then(() => {
  // create a new "Project" and add it to the database
  Project.create({
    title: 'Project1',
    description: 'First Project',
  })
    .then((project) => {
      // you can now access the newly created Project via the variable project
      console.log('success!');
    })
    .catch((error) => {
      console.log('something went wrong!');
    });
});
The sequelize.sync() operation needs to be completed before we can do anything else. This ensures that all of our models are represented in the database as tables. If we have defined a model in our code that doesn't correspond to a table in the database, sequelize.sync() will automatically create it (as we have seen).
NOTE: We do not have to sync() the database before every operation. This is only required when the server starts to ensure that the models are correctly represented as tables within the database.
Once our models have been successfully sync()'d with the database, we can start working with the data. You will notice that we use the familiar then() and catch() functions; this is because both sync() and create() return a promise and as we stated above, we must work with the data after the sync() operation has successfully completed.
If sync() resolves successfully, we then wish to create a new record in the "Project" table, so we use Project.create() method and pass it some data (title and description). If the operation completed successfully, we see the message "success!" in the console - otherwise we catch the error and output "something went wrong!"
Defining Models
One of the most important things we must do when working with Sequelize is to correctly set up our models. Once the models are set up successfully, working with the data is simple. Since each model technically corresponds to a table within our database, what we are really doing is defining tables. Each column of a table within our database stores a specific type of data. In our previous example, we define the column title as a STRING and the column description as TEXT within a table called Project.
Sequelize provides definitions for a full list of types, and each column is given a type. The following is a list of the most common types:
- Sequelize.STRING - A variable length string. Default length 255
- Sequelize.TEXT - An unlimited length text column.
- Sequelize.INTEGER - A 32 bit integer.
- Sequelize.FLOAT - Floating point number (4-byte precision).
- Sequelize.DOUBLE - Floating point number (8-byte precision)
- Sequelize.DATE - A datetime column
- Sequelize.TIME - A time column
- Sequelize.BOOLEAN - A boolean column
So, if we want to define a model (table) that stores blog entries, we could use the following code:
// Define a "BlogEntry" model

const BlogEntry = sequelize.define('BlogEntry', {
  title: Sequelize.STRING, // entry title
  author: Sequelize.STRING, // author of the entry
  entry: Sequelize.TEXT, // main text for the entry
  views: Sequelize.INTEGER, // number of views
  postDate: Sequelize.DATE, // Date the entry was posted
});
NOTE: It is also possible to introduce data validation when we define our models. For a full list of available rules and how they're implemented, see: Validators in the official documentation.
Model Relationships / Associations
In a relational database system, tables (models) can be related using foreign key relationships / associations. For example, say we have a table of Users and a table of Tasks, where each User could have 1 or more Tasks. To enforce this relationship, we would add an additional column on the Tasks table as a foreign-key to the Users table, since 1 or more Tasks could belong to a specific user. For example, "Task 1", "Task 2" and "Task 3" could all belong to "User 1", whereas "Task 4" and "Task 5" may belong to "User 2".
Using Sequelize models, we can easily define this relationship using the hasMany() / belongsTo() methods (since "User has many Task(s)"), for example:
// Define our "User" and "Task" models

const User = sequelize.define('User', {
  fullName: Sequelize.STRING, // the user's full name (ie: "Jason Bourne")
  title: Sequelize.STRING, // the user's title within the project (ie, developer)
});

const Task = sequelize.define('Task', {
  title: Sequelize.STRING, // title of the task
  description: Sequelize.TEXT, // main text for the task
});

// Associate Task with User & automatically create a foreign key
// relationship on "Task" via an automatically generated "UserId" field

Task.belongsTo(User);
If we wish to create a User and then assign him some tasks, we can "create" the tasks immediately after the user is created, ie:
sequelize.sync().then(() => {
  // Create user "Jason Bourne"
  User.create({
    fullName: 'Jason Bourne',
    title: 'developer',
  }).then((user) => {
    console.log('user created');

    // Create "Task 1" for the new user
    Task.create({
      title: 'Task 1',
      description: 'Task 1 description',
      UserId: user.id, // set the correct Userid foreign key
    }).then(() => {
      console.log('Task 1 created');
    });

    // Create "Task 2" for the new user
    Task.create({
      title: 'Task 2',
      description: 'Task 2 description',
      UserId: user.id, // set the correct Userid foreign key
    }).then(() => {
      console.log('Task 2 created');
    });
  });
});
Next, try running this code and take a look at your database in pgAdmin. You should see that two new tables, "Users" and "Tasks" have been created, with "Jason Bourne" inside the "User" table and "Task 1" and "Task 2" inside the "Task" table. The two new tasks will both have a UserId matching "Jason Bourne"'s id. We have achieved the one-to-many relationship between this user and his tasks.
NOTE: Sequelize also supports other types of relationships using:
- hasOne()
- belongsToMany()
For more information, refer to "Associations" in the official documentation.